
How to Series Part 1: Fly Tying with Foam - Guest blog by Kyle Ludwig
Kyle Ludiwg is one of Upavon's core Consultant Team members from the US. An exceptional fly tyer with a particular love of all things foam. Check out his blog below to learn more about this great material.
Foam is an interesting material to tie with. It is not viewed as a traditional material for tying flies, yet, variations and types available to the modern-day fly-tyer make it extremely popular. It comes in many forms: Flat, block, chord, etc, and in a variety of densities and colours. The possibilities are truly endless.
Over the last few years, foam has become one of my favourite tying materials. And for good reason. There are so many ways to tie with it, and it is not just for top water flies either! In this piece, I will cover a few ways to incorporate foam into your fly tying and explain why you should incorporate foam more often in your flies too.
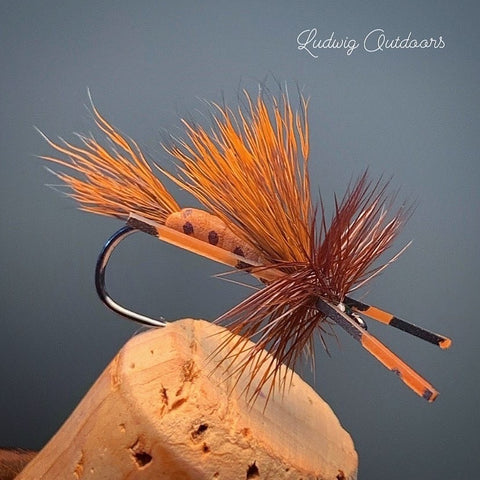
A Bionic Ant tied using Premium HD Foam Ant Bodies
Dry flies/top water bugs:
So why use foam for top water flies? The simplest and most logical answer is that it keeps your fly riding high far longer than most other materials without you having to change them or apply/reapply floatant. Typically, I do not use any floatant on my foam flies, but you most certainly can, especially if you are fishing rougher water, as the fly is guaranteed to take a beating in the turbulent flow. Due to its buoyant properties, the most common use of foam is probably for dry flies or similar patterns. These flies may include anything you want to imitate on the surface of the water. For instance, foam can be incorporated into almost any type of dry or top water fly in some way. Some examples include Sedges, Caddis, Grasshoppers, Crickets, Mice, Stoneflies, etc.
In terms of out-and-out float-ability, foam will often outperform materials such as elk or deer hair, hackle and even CDC. I often pair these materials with the use of foam as well to add depth and added features to my flies. Sometimes, foam flies need more natural materials to bring the fly to life.
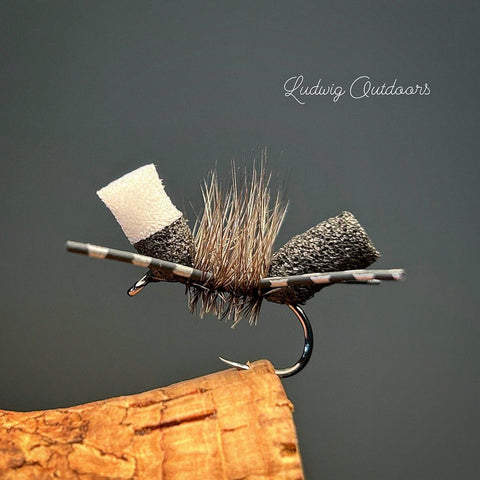
A Foam Sedge tied with our Premium HD Foam Sheet
Subsurface flies:
While foam is most often used with top water flies, it can be used on flies under the water's surface too. Think crayfish, emergers, and other mid-water column bugs. Crayfish flies often incorporate foam on the claws to set the effect of a crayfish in a defensive stance with their claws up above their body as they sit on the bottom of the river bed. You may see some crayfish imitations with the claws being 100% foam. In other ones, you may just see a piece of foam attached to the arms of the crayfish pattern. Either way is ok, as they will have the same effect. It is down to your personal preference and what you want to achieve with your pattern.
Another good use of foam is for emerging imitations, such as emerging Caddis or mayflies.
When using foam for emerging flies, you want to be careful not to use too much. The reason for this is that you want the fly to sit in the surface film. Too much foam and the fly will ride too high. Too little, and the fly could sink. You will have to experiment with how much foam you may need to use depending on other factors. These factors include other materials used and the size of the fly you are tying. A great way to do this is with a glass of water. Drop the fly-in and see how it sits. This process requires a bit of trial and error, but it is worth it! Fish often reject flies that do not sit right, especially at this stage of their lifecycle.

Premium HD Foam Sheet emerger pattern
For emerging foam bugs, typically, the wing case of the fly is the only part I will use foam for. This is for two reasons. Firstly, the shape of the foam and its positioning imitate the bulging wing case of the fly. Secondly, the buoyancy of the foam makes the fly rise slowly towards the surface, imitating a nymph trying to swim towards the surface. To balance this, I will often even add a little weight to the fly to help it from trying to float. The trick here is to have enough foam so the fly doesn’t want to sink all the way, but also not enough to where it rides on top of the water. You will have to experiment with how much to use. With practice, you can achieve an almost neutral density presentation. This is actually part of the fun in my opinion.

A Foam Mouse tied with our HD Foam Block cut to size
With all that said, these are just a few ways to incorporate foam into your fly-tying. I absolutely love using foam and once you start incorporating foam into your flies, I bet you will love it too.
We hope you enjoyed this blog. Use code FTWF to recieve 10% off Upavon Foam Products on your next order. Check out Upavon's full range of foam fly tying materials and tools.
Commenti
Pubblica un commento