
Fly Tying For Beginners - How To Start
The New Year for many brings new motivations and personal targets. In angling terms, a New Year's resolution for many is the desire to start fly tying, or maybe make a long awaited return! Maybe you’ve received some fly tying gear as a Christmas gift and are still learning the ropes, but in either case this blog has been created to provide advice and assistance in order to get you up and tying.
Now, Fly-tying itself for beginners can seem like a minefield. With a plethora of vices, tools, and materials available on the market today, it can be challenging to know where to start. I have tied flies for the last 12 years, and I am still learning! If you have got this far without logging off, the following blog will endeavour to provide a simplified guide for those just starting. However, even if you are proficient, there may still be some hints and tips you may find useful.
KIS (Keep It Simple)
First up is KIS. I have refrained from the classic KISS or Keep It Simple Stupid because fly tying is all about experimentation and learning. There are no stupid questions or stupid flies. They are a product of your imagination and your creativity. However, when you are starting, keep it simple. One of the best pieces of advice I received when I first started, was you must learn to walk before you can run. While flies, in their definition, are a product of your imagination, when you first start, you are limited by your capabilities. What I mean by that is you need to learn the basics before you can tie any pattern, let alone more complex variations. Skills like thread control, understanding fly proportions, wrapping hackles and whip finishing, to name a few.
I spent time just whip-finishing a bare hook when I started. Although it was mind-numbing, it meant I had it perfected when I began to tie flies properly. It is an essential yet complicated skill to master, but there are plenty of tutorial videos on YouTube which provide clear step-by-step walk-throughs of these skills. Once you have mastered core competencies, the world is your oyster. You can tie almost anything with practice. Tim Joyce has some great step by step videos on his channel, check it out here on YouTube.
Tools - Invest where it counts
Fly-tying vices and tools are where it gets a little more expensive. However, Tools are a key area of investment. The key tools you will need to start are as follows:
Vice
It would be a bit tricky to tie without one… In terms of vices, there is a vast range available on the market ranging from around £80-£1000. Now, I would not recommend a beginner purchasing a vice at the top or bottom of the range. I would recommend a mid-range vice that will last and not break the bank, but it will last you! For an extra £100 or so you can get a vice that will last you decades. Something like a Stonfo Kaiman would be a good option, it has a stable base and strong jaws whilst offering excellent value.

Scissors
Scissors are a classic case of buy cheap, buy twice. It is surprising how much investing in a good pair of scissors will improve your fly tying. A pair of good quality, fine-point scissors like a pair from the Kopter range are a great choice for fine work. And most importantly, they will last and will not go blunt with use. I’d recommend the entry level Ibis scissors featured below.

Bobbin
When you begin fly tying, snapping your thread will be the most frustrating part of your learning curve. A good quality bobbin with a ceramic insert will minimise thread abrasion and fraying. You can also minimise this by using a GSP or flat thread. However, these threads tend to slip and can make your tying more complicated if you are not used to them. Consider an adjustable bobbin (such as those from Stonfo) to help you manage thread tension, another cause of snapping thread.

Whip Finish Tool
Whip finish tools are essential, but you do not need to worry too much about the price point. There are a range of shapes and sizes, but they all achieve the same thing. With these, you can buy standard or rotary tools. Due to the motion of the whip finishing process, some find a rotary tool easier to use as it offers a smoother action. However, it can be more difficult to manage when you are just starting out. Therefore, a standard model is a good place to start to learn the movement. Once you have it cracked, I would advise trying a rotary model to see which you prefer.

Hackle Pliers
These will make wrapping hackles a breeze! Similarly to the whip finish tool, there are a few variations. Some are standard and others have a rotary function that makes wrapping the hackle easier. I would suggest starting with a standard model and getting to grips with the movement first. Then once you have got to grips with this you can try a rotary model.

Needle and bobbin threader
I have put these together, as the Upavon 4-in-1 multitool offers both as well as a scalpel and a leg knotting tool. All elements of this tool are handy to have on your desk, and the combination of the 4-in-1 will save you some money. The needle is great for applying varnish to flies or clearing it out of the eyes of the hook. The bobbin threader, as per the name will help you change threads on your bobbin. Scalpels are handing for cutting foams and furs as well as threads like GSP. And finally, the leg knotting tool will help you make realistic knotted pheasant tail legs. Here is a short video highlighting the features and their uses YouTube.

Materials – A brief breakdown
I will not go into too much detail when it comes to materials, as the options are endless, and I want to keep this simple. Instead, I will cover the most important ones for those just starting and you can chose based on your style of fishing.
Hooks
Hooks are available in barbed and barbless, in various shapes and sizes. Different models will suit different types of flies. For example, a dry fly or light wire hook is good for dry flies, whereas a heavy or wet hook is better for nymphs and larger sizes for lures. For still waters, generally size 10s and 12s are most common, and for rivers size 14-18. Barbless hooks have grown in popularity in recent times, read our previous blog on barbed vs barbless to understand the differences. We also conducted an experiment on curved vs straight hooks, you might be interested in the results
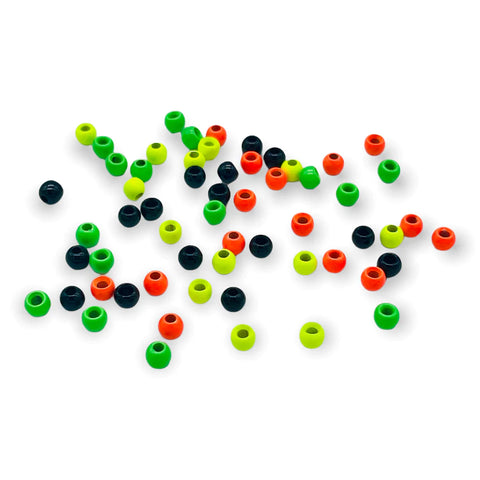
Beads
Beads are a great option for adding colour to your flies, but most importantly assist with achieving depth and movement. In terms of beads for beginners, while tungsten beads are fantastic for fast flowing rivers to get the flies to depth quickly, as a beginner consider starting with brass for other applications as they will prove more cost effective. Beads are available in slotted (for jig hooks), countersunk (for straight hooks), metallic and painted, just depends more on the fishing scenario. An essential material for fly tying Upavon provide a wide range of fly tying beadsws for your consideration.
Thread
Thread, after the hook, is arguably the most important consideration. For beginners, I usually recommend a flat thread like UTC 70 thread. UTC 70 is a strong, flat thread that allows you to get used to managing thread tension when tying without worrying too much about breaking it. As you become more accustomed, you can try threads like Uni Thread in 8/0. A thinner more rounded thread that is better for smaller patterns, but requires good thread management as too much tension will snap it. Finally there are braided iridescent threads such as Nymph-it, these woven threads combine colours and materials to acheive a unique effect, awesome for nymphs, buzzers and perdigons, Nymph-it is a highly versatile thread.

Feathers
Feathers cover a broad range of materials. Generic capes, either Cock or Hen, have completely different properties and uses opposed to a high quality Metz or Whiting cape which are often finer and smoother. Feathers like pheasant tails, Peacock herl and CDC are also musts for new fly tyers, often forming the basis for a wide variety of natural patterns. And of course the master of feathers, marabou, possible the most popular tail material offering the best movement and colour. If your preference is the traditional approach then consider purchasing these natural materials first.

Furs
Furs, much like feathers, offer a huge range of options. A few good starting materials would be rabbit zonker strips and some deer hair. Zonker strips can be used as tails, bodies or for dubbing. Deer hair varies by species, but a patch of Roe Deer or Elk hair are a great place to start. It is a material that takes time to master, but well worth it for the results.

Dubbing
There is a plethora of dubbing available to the modern-day fly tyer from natural fur to synthetic, to a mix of both. A good place to start is with a dispenser box. These are slightly more expensive than packs of dubbing, but they provide a samples of a range of different dubbing types or colours that will cover everything you could need. Once you establish those you like, you can buy them by the pack. Alternatively, if you are focusing on learning specific flies, then ensure you purchase hollow fibre floating dubbing for dries and fine iridescent synthetic dubbing for nymphs and lures.

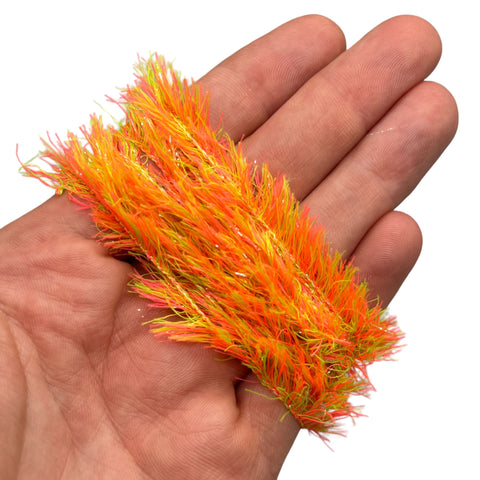
Synthetics
Synthetics cover everything from fritz to straggle to flash and foam and are a key ingredient for modern patterns. For beginners, I would recommend a couple of packs of blob fritz and maybe a pack of straggles or two in different colours. If you already fish, these can be based on flies you like to use. Your fritz collection will grow rapidly as you try more colours and styles, but a couple of packs is enough to get to grips with it. In terms of foam, sheets or blocks with cutters are a good option. These will allow you to tailor your foams to your personal use. In terms of flash, UpFlash or Krystal flash are great starting options that can be incorporated into almost any fly. You can learn more about chenilles reading our previous blog.
Wires and Tinsels
Wires and tinsels are predominantly used for ribbing flies. Again available in a wide range of colours and sizes. However, to begin with I would recommend a small copper and silver wire and maybe a medium pearl tinsel. These or braided threads like Nymph-It can be used as a lightweight substitute for dry flies and bodies and should cover most of what you need in the beginning.

What to tie?
If you are like me, the best way to learn is by doing. When starting, select a handful of simple patterns that require a range of skills. My top 4 flies for beginners would be an Adams Dry fly, a Pheasant Tail Nymph, a Wooly Bugger, and a Fritz Taddy. I will explain why below.
The Adams:
The Adams Dry Fly is a world-renowned dry that has caught more fish than you could shake a stick at…unless you have a very big stick! The reason I chose this pattern is simple. It has a tail, a tapered dubbing body and a hackle. Thus, incorporating 3 crucial skills you will want to master as a beginner. Firstly, tying in the tail. You need to ensure it is the correct length and is not too bulky. The dubbed body will teach you how to make a dubbing noodle and build a tapered dubbing body. Lastly, the hackle. A key skill to acquire as a Fly Tyer. The hackle should be proportionate to the fly and not be too bulky to ensure it remains natural and sits correctly in the water.

Tied by Upavon Consultant Garrick Eckard using Upavon UpSilk Dubbing
The Pheasant Tail:
A rather historical pattern developed by Frank Sawyer. A pattern present in every fly angler’s box in some variation. The Pheasant Tail Nymph, or PTN, is a great starter Nymph. It will teach you how to wrap a pheasant tail body and rib a fly to segment it. Furthermore, it will teach you how to create nymph-like shapes and learn proportions when tying a thorax on a nymph. A simple, yet essential element to help your flies look more lifelike.

Tied by Ben Worley using Upavon Tyers Mate Metallic Nymph-It
The Wooly Bugger:
The Wooly Bugger is another old classic. Used the majority of the time on Rivers in the US, but it is a Stillwater fly in the UK. The combination of Marabou and a hackled body produces a fish-catching magnet! However, as with the previous patterns, this is a great fly to learn essential skills. Marabou is a fantastic material for beginners. Its versatility and forgiving nature make it a great material for those starting. It will also aid your understanding of the proportions of larger flies. An important note is that less is more with Marabou. The less you have, the more movement you will have in your fly. The Wooly Bugger body also comprises of a palmered hackle. Unlike the Adams or other dry flies, the Wooly Bugger has a spaced-out hackle, which allows you to see the bugger chenille or dubbing beneath.

Tied by Upavon Consultant Garrett Lesko using Upavon Humungous Fritz
The Fritz Taddy:
A great pattern for trout on lakes and reservoirs. These are tied with marabou tails, and either a fritz or straggle body. The core skill you will develop from tying these is learning how to manage fritz. The best way to tie with this is to pull the fibres back after each turn to ensure you are not catching any unwanted fibres under your turns. On the contrary, Straggle is far sparser and provides a lot more movement. Both have their day, so it is worth experimenting.

Tied by Upavon Consultant Garrett Lesko (USA) using Upavon Green Flash Dragonfly Straggle
The favoured quote all fly tyers live by is the claim that there is nothing quite like catching a fish on one of your home-tied-flies. It is true. It is an indescribable feeling of pride and joy that every fly angler should experience at some point. It can be frustrating, at times when you begin, but stick with it, and you will be rewarded.
In order to assist you in your journey we are offering 15% off fly tying products at http://www.upavonflyfishing.co.uk using discount code GETSTARTED15.
Please subscribe to our newsletter for more blog notifications.
Commentaires
Laisser un commentaire