
Understanding Chenille - Selecting Materials & Tying Techniques
Upavon are a UK based fly fishing supplies company who manufacture a wide range of fly tying chenilles from raw materials. We thought it was about time we shared our experience with our customers to help you select, tie and catch fish using the best options available.


 Utilising golds, silvers, reds etc to createmetal colour flash materials which are useful to create bodies to palmer natural hackles over on flies such as the Humungus (Tutorial here) Can also be combined with dyed coloured fibres to create examples such as Dennis the Menace (black with red flash). Absolutely killer for fry and baitfish patterns, in particular the silver UV straggle hackle featured here.


There are so many varieties of synthetic chenille available on the market it can be quite confusing and overwhelming for the modern day fly tyer. While new innovations are welcome, it’s important that we keep up to date with new materials and techniques to ensure we continue to develop new patterns, either for personal challenge and enjoyment or to tempt more fish to the net. This article aims to outline the types of chenilles available and how best to use them. We have provided links (text in pink) to products and YouTube tutorials throughout to assist you. But enough introduction, let’s get to it!
(Green Flash Dragonfly Straggle Hackle coming off the Upavon production line)
Material Types
First let’s cover the multitude of materials available to help make sense of them, we have broken these down into the most common – each having their place on a given day.
Classic/Standard/Cactus.
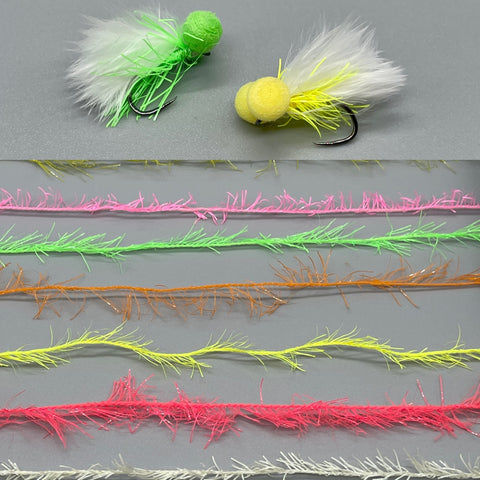
Pretty much the most popular fritz, proven and simple to use and dyed in a huge variety of colours. Catches fish all over the world and can be combined with additives such as pearl, flash and UV featured here. The original - nothing more to add.
Neon.
Manufactured from a material that displays particularly bright colours, it’s fairly stiff and thicker than the classic fritz fibres and the colours really beam out. Perfect for attractor pattern to lure fish onto your cast.
Jelly/Jello/Trans/Translucent.
Soft, translucent fibres that look like jelly when wet. Great for imitating Daphnia, eggs or anything soft and gloopy that the fish would find appetising.
Pure.
Unique to Upavon, this formula uses dyed yarns to create consistent, bold colours that are resistant to running and fading. These materials are softer than the ‘traditional’ alternatives and combine well with additives such as UV and flash such as this Blue Flash Damsel.
Two Tone/Bi-Colour.
This can use ‘Pure’ formula or blend dyed and un-dyed materials to create a two coloured effect on the chenille. Produces something different, often unique.
Metallic/Humungus.
Utilising golds, silvers, reds etc to createmetal colour flash materials which are useful to create bodies to palmer natural hackles over on flies such as the Humungus (Tutorial here) Can also be combined with dyed coloured fibres to create examples such as Dennis the Menace (black with red flash). Absolutely killer for fry and baitfish patterns, in particular the silver UV straggle hackle featured here.Core Types
Fritz chenilles often have a stretchy nylon core with a bonding agent to hold fibres in place, often called ‘bonded’, ‘gel core’. The old school chenilles are normally based on a cotton core which doesn’t stretch and the fibres are liable to fall out if agitated, however not to be ignored, there are a few unique combinations out there that can no longer be manufactured! Straggles have the fibres woven into the core, so no bonding agent is required.
Common Chenille Patterns
Blobs, FABs & Booby Blobs
So let’s start with the staple diet for most stocked (and some wild) Trout, the blob and variations there of. This material can be manufactured using numerous materials to a achieve a huge variety of options, but as many competition anglers will agree there are days when one colour or size will out fish another. They are commonly available in 15mm (width measured across the diameter of the fibres) which is generally used for lures and attractor patterns ‘blobs’ as they are named due to the way the material bushes out when tied in. However, it can be manufactured as small as 3mm to make bodies or combined together to make multi coloured patterns such as Pink Death Booby Blob (Tutorial here) and the more complex but highly effective Halo Blob (Tutorial here). In more recent years, the use of 10-12mm chenille has seen a rise in the use of ‘Midget Gem’ smaller blob and Foam Arsed Blob (FAB) patterns where colours such as black have proven effective to imitate snails.
The general idea with the small blobs is to target pressured fish that have seen the bigger patterns and more likely to take something smaller. Micro fritz (3mm-7mm) is really effective to lay bodies, tie in thoraxes or combine with other materials to complement natural materials.
Lures, Buggers, Streamers and Natural Straggle Variations
Straggles are much more versatile than the blob type chenilles, manufactured using the same materials but have more applications across the size range. We supply our Upavon Straggle Hackle range from 4mm-14mm, each having its own multitude of applications only restricted by your imagination.
By their nature, straggle materials have a sleeker profile in comparison to the blob fritz style chenille. This provides an excellent body material for adding coloured thoraxes behind natural hackles or full bodies. It can be used to tie in hackles to booby flies when used with marabou and foam, or alternatively utilising the 14mm size to create sleek booby blob type flies. But they really come into their own when used to create nymph style lure patterns such as this Dragonfly variant.
Top Chenille Tying Tips
1. Pull back the fibres on each turn, ensuring that they sit to the rear of the fly and don’t get stuck under the core as it’s turned over.
2. Wet the material before use. Have a cup of water available to soak the chenille before tying, it will be easier to hold back fibres and help them align more tidily.
3. Flies coming out too big and bushy? Start tying the chenille in above the hook point when using 15mm fritz, you should just make out the hook bend when the material is dry after tying.
4. To achieve a neat head finish ensure you leave 1mm free at the hook eye and lock in place with 2 thread turns with the chenille orientated horizontal to the desk. This allows the thread to pass between the fibres rather on top of them which will trap them on the head. Then pull it all back and do 2-3 more turns in front before cutting the access. Then simply whip finish over the exposed chenille.
5. Top tip, as previously mentioned, try combining with natural materials on Buggers, nymphs, Dabblers and baitfish patterns it can really boost your patterns and increase catch rate.
Credit Chris Rawle Fly Tying
Summary
We really hope you found this blog useful, please contact us if you have any questions in the comments or using the chat function on the website. Please also take a look at our Upavon UK manufactured chenille range and sign up for more blogs below.
Tight Lines for the 2022 season.
The Upavon Team.
Kommentare
Einen Kommentar hinterlassen